- HubPages»
- Technology»
- Internet & the Web»
- Web Page & Web Site Development
How to Set Up Your Own Self-Hosted Blog or Website with Wordpress
Why use Wordpress?
Before Wordpress and other content management systems were available, the only option for a budding web editor was to roll your sleeves up and learn html (hypertext mark-up language), or develop a website from the ground up using a web development application such as Dreamweaver or Mircosoft FrontPage. For commercial websites html is still the preferred option, but most amateur bloggers don’t have the time and technical skills to make this viable. A gap in the market was identified by the likes of Wordpress and Blogger, who realised that people wanted their own websites, and could write their own content, but needed a quick and easy way of getting their content online using an existing hosted platform.
Wordpress took this a stage further, and rather than insist on using their hosted platform, they allowed bloggers to host their own websites, with unique URL’s, whilst still having access to the powerful Wordpress authoring software. Due to the open nature of the platform, third party developers have created a host of Wordpress compatible website themes and plugins, many of them provided free as a showcase for their skills, which ensure that your blog can feature all of the bells and whistles of a professional site.
With a large and active community of Wordpress users, you will have all the assistance you need to launch the website you have always wanted, for the cost of a URL and a cheap web hosting plan.
From Zero to Website Launch in 10 Steps
If you are reading this you have probably decided that this is the route you want to go down, or are weighing up the options to understand how easy it would be to launch your own self-hosted Wordpress site. Whilst this may at first seem daunting, the following 10 steps will take you through the process and ensure you get up and running as quickly and painlessly as possible. Within 24 hours you could be up and running with your own website!
Wordpress User Poll
Are you currently using Wordpress?
Step 1 - Find a Host
A web host will provide the hardware and infrastructure where your website resides, as well as help you manage the process of selecting and using a custom URL. Think of your host as being a big warehouse with row on row of networked computer servers, one of which will be storing the files needed to maintain your site. You are just paying to rent server space and provide a connection to the internet. In choosing a host you need to investigate compatibility with the Wordpress software, but rather than look at the individual requirements (there is a long list) I would just locate a host based on monthly price first, and then use Google to find if anyone else is using the host with Wordpress. I personally use 1and1 Web Hosting, I have never had any problems with the service for my websites, but there are plenty out there to choose from. Start with a cheap plan, you can always upgrade at a later date, and look out for a plan that includes a certain number of URL’s as part of the price.
Step 2 - Secure a Unique URL for your Website
There is a lot of research out there on how to choose a website name, so I will focus on the mechanics of finding and securing a URL. The easiest place to start is your new web host, who will most likely have a domain search section on the website. Enter the URL you are after, and the host will tell you if it is available, and what it will cost to buy. If it is not available, try some variations on your chosen keywords until you get the URL you want. It’s easier to buy through your new host as the URL will be available to you within 24 hours, the cost added to your existing plan, and by the time you have configured and uploaded your Wordpress files it will be ready to link to your new website.
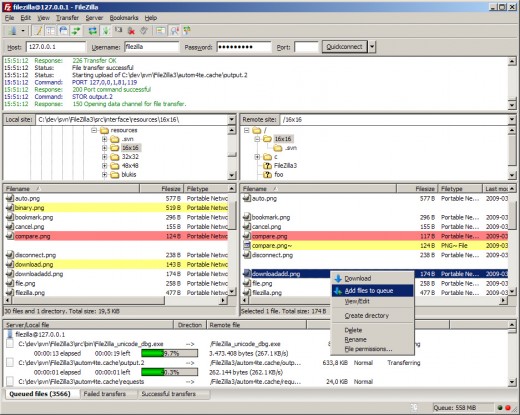
Step 3 - Find an FTP Client
Most web hosts come with an online file transfer function, but in order to transfer large amounts of files between your PC and a web host, I would recommend an FTP (File Transfer Protocol) client. Think of an FTP Client as a windows file manager – on one side of the screen your “local” files on your PC, and on the other the “remote” files on the web, and you just have to drag the files across for them to be loaded onto the server, or back to your PC. I use Filezilla, a free program which seems to work well without too much setup required, and simple drag and drop functionality.
In order to connect to the remote site, you will need to setup the connection with the host, use the FAQ section on your host’s website to find the connection settings to enter into the FTP Client, as well as your unique account name and password. You should now be able to see the root directory on your server, where your website files will be stored.
Download FileZilla
Step 4 – Setup the Wordpress MySQL database on the server
In order to run wordpress, your host needs to be set up with a MySQL database, which Wordpress will use to hold the posts and pages that you create. To create the database, login to your web host through a web browser, locate the SQL Database settings, and follow the instructions to create a new database and user. You need to make a note of the database name, and also the username, so you can enter this information in the Wordpress configuration in Step 6. The MySQL database may take a short while to become available, so be patient.
Step 5 – Download the latest Wordpress software
Wordpress.org holds the latest version of the software – just Google “wordpress download” to locate the file, or select the link below. Save the .zip file and extract onto your PC, so that you can open and edit the files necessary to configure your blog before upload to the website. Be careful to retain the folder structure of the unzipped files, as you will need load everything to the web host in the same format it was downloaded.
Download Wordpress
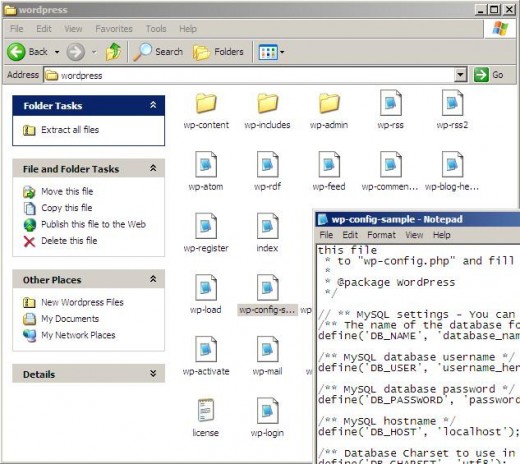
Step 6 – Configure the Wordpress files
Before you begin, make sure you have all of your host account details and MySQL database login information to hand. Follow the detailed instructions available on the Wordpress site, search for “Wordpress 5 minute install”. You can use any simple text editor, but you need to be careful not to introduce any hidden characters, so something like Microsoft Notepad or Wordpad is a better option that Microsoft Word. You will only need to amend one file, titled wp-config-sample.php, which is located in the top Wordpress folder. Follow the instructions to the letter and save the file as wp-config.php in the same directory as the wp-config-sample.php file.
Step 7 – Upload the Wordpress software to the server
Once the Wordpress configuration files have been updated with the details of your host, you need to upload the config files to the server. Create a new folder in the root directory of your web host and name it something memorable, such as the name of the website – don’t worry too much about the name as no-one will ever see it. Use the FTP Client to select every folder and file below the Wordpress directory on your PC, and drag them all across to your newly created folder on the web server. This may take a few minutes depending on your internet connection, but you should see the progress displayed on the FTP client as the files upload.
When this is complete, the wordpress files on the web server should mirror the same files on your PC.
Step 8 – Connect the URL and run the Wordpress Install
24 hours after setting up your new URL (also known as domain name), it will be available on your web host. You need to “forward” the domain to your newly created directory (from step 7), ensuring that when someone enters your URL, they access your website. Complete the install by entering the full URL in your web browser in the following format:
yourdomain / wp-admin / install.php
This should display the wordpress setup panel, which enables you to set up a webmaster username and password, as well as some other basic details such as your email address and the name of the site. Once this process is completed, your wordpress blog is technically live, if a little boring as it will have no content!
Note : Make sure you don’t take a break between forwarding your domain and running the setup process, as it will be temporarily available for anyone else on the web to run if they know the URL, requiring you to delete the wordpress files from the web host and start again!
Wordpress Video Tutorial
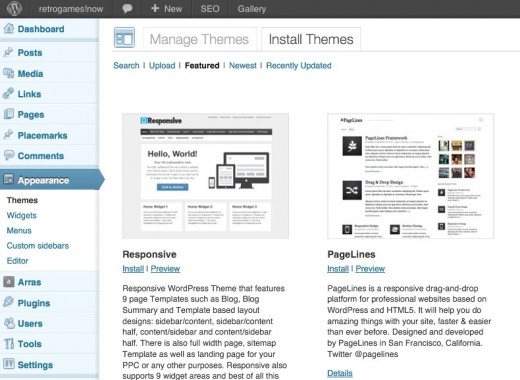
Step 9 – Choose a Theme and Plugins
Before you start to add content you will need to consider the format for your website, which will then dictate the theme you adopt and plugins to be added
- Themes dictate the overall format of the website – the number of columns, the colour scheme, graphical formatting etc. as well as the organisation of formatting of each “post” and “page” on your site. Themes allow you to quickly change the look and feel of your entire website without adjusting the underlying content of pages, which reside in a permanent database
- Plugins are additional elements of functionality that can be bolted onto your site, either in the background to manage things like SEO, or as widgets which can be display additional information from your site or another website on a page or post. Examples of widgets might include a list of your Twitter followers, or a preview of a Youtube video.
It is incredibly easily to get lost in a myriad of theme options, so I would advise starting with a picture of what you want your site to look like, the type of content you want on the home page and each content page, and then look for a theme the most closely resembles this. The most popular themes are listed on the front page of Wordpress, and you can’t go far wrong choosing a theme that has been used by many thousands of people – at least there will be a lot of active users out there who can help if you need support. Many themes will have their own theme options that will be accessible from the Wordpress user control panel, which allow you to set global theme options such as the colour scheme, graphics to use for the website header, and what to show on the homepage.
When it comes to Wordpress plugin’s its also possible to go overboard if you are not careful due to the many thousands of examples available. The best rule of thumb is to add plugins as a need arises in the development of your site. Add, configure and test each plugin individually to make sure that they work in conjunction with your theme, and also other plugins, which sometimes conflict with each other. Again, if you focus on plugin’s that many other people have downloaded then you can’t go far wrong.
Step 10 - Add Your First Live Post
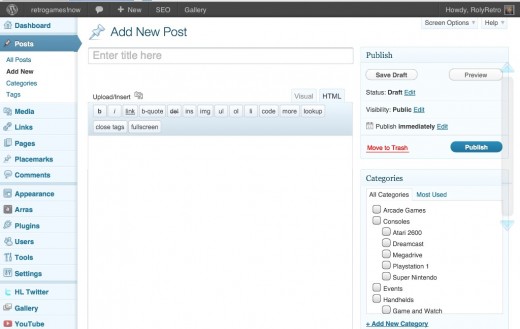
The detailed configuration of a Wordpress website is the subject for another hub, but you have now done enough to create your first “post”. Select “add new” from the post section of the Wordpress admin panel, enter a title and some content for your post, and select “publish”.
Congratulations, you are now a proud owner of a self-hosted Wordpress blog! Whilst this process may seem daunting at first, you will find no end of support available from fellow WordPress user forums. Follow these 10 steps and before you know it you it you will have a professional looking website, and rather than worrying about the technology, you can focus on developing some great content for your readers.
